Search Linux Here

Google
 
Showing posts with label Ubuntu. Show all posts

Wednesday, March 19, 2008

How To Install Gnome-Do


Yesterday I started using an application called Gnome-Do, which I have to say is awesome. If you’ve used Quicksilver on OSX or Katapult on KDE its really similar. It’s a quick-launch tool to get you what you need as fast as possible (but not faster, of course!). It allows you to quick launch desktop applications with a few quick keystrokes and just generally makes life easy.

I thought I would outline how to install Gnome-Do on Ubuntu 7.10 “Gutsy” and also on Ubuntu 8.04 “Hardy” for those early adopters like myself.

Installing Gnome-Do on Ubuntu 7.10

To install Gnome-Do on Ubuntu 7.10 “Gutsy” you’ll need to add the Gnome-Do PPA from launchpad. Add the following line to your /etc/apt/sources.list file:

# deb http://ppa.launchpad.net/do-core/ubuntu gutsy main

After you’ve added the repository you’ll need to update your repository cache and then install the package. Two more commands to take care of that:

# sudo aptitude update
# sudo aptitude install gnome-do

Installing Gnome-Do on Ubuntu 8.04

For those early adopters out there that are already running Ubuntu 8.04 “Hardy” you’re lucky to have Gnome-Do in the repositories. You’ll just need a simple:

# sudo aptitude install gnome-do

To launch Gnome-Do you’ll need to start it manually. This can be done a few ways:

1. ALT-F2: gnome-do
2. Open a terminal: gnome-do
3. Add it to your System > Preferences > Sessions: gnome-do –quiet (for autostart at login)

Once it’s launched you can access the Gnome-Do interface via “Super”-space (windows button+spacebar). This key binding can also be changed in the gconf-editor (/apps/gnome-do/preferences/key_binding) On my next post I’ll outline how to install Gnome-Do plugins, which add so much more functionality you’ll be amazed. I’ve also hacked together a Gnome-Do plugin myself that will let you quickly install packages via Gnome-Do. I’m looking for a few good C# devels that can help me improve it. Details soon!

How To Install SELinux on Ubuntu 8.04 “Hardy Heron”

I’m really happy to announce that SELinux is now available in Ubuntu 8.04 “Hardy Heron”. This is the result of the amazing work of the ubuntu-security and ubuntu-hardened teams, as well as the huge contributions from the folks at Tresys. (note: SELinux will not be the default, but is available as a security option.)

If you would prefer to use SELinux over AppArmour, or if you’re just a good soul that would like to help test Ubuntu’s SELinux implementation, please read on.

Install SELinux in Ubuntu 8.04

All that is needed is to install the SELinux package, which will remove AppArmour and apply the SELinux policy.

# sudo aptitude install selinux

If you run across any issues or bugs please report them against SELinux on launchpad. Welcome to a more secure Ubuntu!

Installing Ubuntu with Windows Dual-Boot


This screencast shows how to install Ubuntu on a system that already has Windows installed.

This includes:-

  • Accessing the Open Source software on the CD
  • Booting to the live Desktop CD
  • Checking the disk partitions
  • Installing Ubuntu
  • Rebooting to the install of Ubuntu on the hard disk
  • Checking it's still possible to boot to Windows

Distribution: Ubuntu
Version: 6.06.1 (Dapper Drake)
Architecture: i386

Stream
Watch now (via Google Video)

Download
OGG (22MiB) 1024x768
MPEG4 (33MiB) 1024x768
MOV (12MiB) 320x240
AVI (71MiB) - Available on request

Connecting to the Internet


To connect to the Internet:

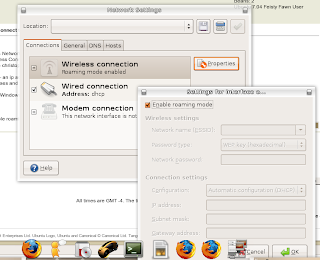
  1. Open SystemAdministrationNetworking.

  2. Select the connection you wish to use, then click Properties.

  3. Ensure Enable this connection is turned on.

  4. If your ISP or network administrator has given you an IP address, set Configuration to Static IP address, then enter the address in the IP address field and click OK. Otherwise, set Configuration to DHCP and click OK.

  5. To activate or deactivate network connections, select your connection, then click Activate/Deactivate.

Thursday, February 28, 2008

How to clone an installation : Ubuntu (5.10 / 6.06.1 / 6.10)

How many times have you reinstalled your machine? I know I long ago lost count. It isn’t that it is unreliable but, in my case, I often upgrade to new versions or reinstall to test things out. How nice would it be if you could clone your current installation and fairly easily reinstall to just about the same stage you were before you changed? This post will tell you how!

The first thing to remember is that Ubuntu uses the APT package management system which handles installed packages and their dependencies. If we can get a list of currently installed packages you can very easily duplicate exactly what you have installed now on a future machine. Below is a command you can use to export a list of your installed packages.

# sudo dpkg --get-selections | grep '[[:space:]]install$=' \| awk '{print $1}' > package_list

update: (see comments) - the blog reformats the single-quotes around the parameters for grep & awk. Note that both should be the character on the quote key. Also, the “–get-selections” is a double-dash, although it doesn’t appear as such.

At this point you should end up with a file called “package_list” which consists of a long list of every package your currently have installed.

The next step would be to tell the clone machine to install each of those packages. You’ll have to copy that file to the clone machine (via network, usb drive, email, etc) and also make sure to duplicate the /etc/apt/sources.list file. Without the same access to repositories it may not be able to find the packages.

To tell your system to use the previously exported package list use the following command (after making sure to also clone your /etc/apt/sources.list file):

1. sudo aptitude update
2. cat package_list | xargs sudo aptitude install

Note: this should only be used between the same distribution and the same release version. Example, only use this to clone a 6.06.1 to 6.06.1 machine. You will run into problems in trying to clone from 6.06.1 to 6.10 or similar.

How to enable DVD playback : Ubuntu (5.10 / 6.06.1 / 6.10)

DVD playback is not a feature that is installed by default due to license restrictions. In my opinion the restriction is stupid, very restrictive and violates my rights (of course I am not a lawyer so don’t listen to my rants.) This tutorial will show you how to install DVD playback capability on your Ubuntu linux machine.

note: in some areas this is not legal. If that is the case for you you can 1) continue to let some corporation demand payment to be able to playback the DVDs you already paid for, 2) stop watching DVDs altogether or 3) tell them to take a hike and install playback anyway. Viva la revolucion!

Installing DVD playback is pretty simple. You’ll need to install the Seveas Repository before you’ll have access to it and then simply run:

# sudo aptitude install libdvdcss2

or, if you prefer not to install Seveas repository you can run the following command to automagically download and install the appropriate files:

# sudo /usr/share/doc/libdvdread3/./install-css.sh

We desperately need a change to our countries laws in this regard, at least in the US. Until then we simply do what has to be done.

update: if you find that, for whatever reason, you don’t have the above file to run and install you can try to take a look at this comment for an additional method.

How to use gaim for gmail chat

In response to my earlier post I wanted to make a how-to publically available for those that aren’t familiar with setting up Jabber. If you have a gmail account you already have an account with Jabber. Gmail’s chat uses the Jabber protocol so you’re already half-way there. (If you don’t have a gmail account you really should, post a comment and I’ll send you an invite)

This how-to depends on 1) gaim, 2) gmail account.

  1. ‘Add Account’ in Gaim
  2. Use the drop-down & select Jabber
  3. screen name = your.address (before @ sign for gmail)
  4. server = gmail.com (you do not need to use the @ anywhere)
  5. resource : I don’t know the importance of this–I use the default
  6. password = your gmail password
  7. alias = what do you want to be known as?
  8. more options / advanced
  9. connect server : talk.google.com
  10. Register & Connect

Any contact in your gmail address book will be available under your new account.

Monday, February 25, 2008

Install MySQL Server 5 on Ubuntu

Installing MySQL 5 Server on Ubuntu is a quick and easy process. It almost feels like it should be more difficult.

Open a terminal window, and use the following command:

# sudo apt-get install mysql-server

If you are running PHP you will also need to install the php module for mysql 5:

# sudo apt-get install php5-mysql

To create a new database, use the mysqladmin command:

# mysqladmin create

After that is finished, you can test MySQL by running this, where zzzz is your password

# mysql -uroot -pzzzz

See, really easy!

Installing PHP in UBUNTU

This is a way to install PHP, type or paste this into your terminal:

# sudo apt-get install php5 libapache2-mod-php5

Once it's finished installing, restart apache, using:

# sudo /etc/init.d/apache2 restart

Testing PHP
Now, let's make sure that PHP is working properly. To do this, we're going to run phpinfo(). You can, of course, swap out gedit with your editor of choice.

# sudo gedit /var/www/phpinfo.php


Type or paste the following into the document, and save it. (remove the space before the '?php')

< ?php phpinfo(); ?>


Now we can test PHP by browsing to:

http://localhost/phpinfo.php


Installing apache on Ubuntu

This How-to is to get the latest apache .. I Hope this article can help U to install apache..

To get Apache, try type this code in terminal
# sudo apt-get install apache

or
# sudo apt-get install apache2

after that, you can test your apache with this code :
# firefox "http://localhost"

or
# http://localhost

Once apache2 is done installing, you can go ahead and test it by using:
# sudo /etc/init.d/apache2 start

I hope this article can help u to build a web server....:)

Friday, February 22, 2008

Ubuntu Mirror

This technical document gives an overview of the process of creating either a private or public mirror of the Ubuntu software. Additionally, the requirements for becomming an official Ubuntu mirror are described.

A full list of official archive mirrors can now be found in launchpad.

https://launchpad.net/ubuntu/+archivemirrors

Each mirror listed in launchpad is verified at least every 24 hours. You are recommended to select a mirror marked "Up to date" that is located geographicly near you. If you are unsure which mirror to select the best option is [iso-country-code].archive.ubuntu.com where iso-country-code is the two character country abreviation of a country near you. For example, if you live in the United States you could choose us.archive.ubuntu.com

As Ubuntu grows in popularity, so does the need for reliable mirrors to support the Ubuntu community. If you are reasonably familiar with apache, ftp and rsync, have available resources in a secure location such as an office or data centre and wish to help Ubuntu, you may wish to consider setting up an Ubuntu mirror.

Download Newest Ubuntu Version Now

Download Ubuntu Now!!
DOWNLOAD HERE For FREE!!


The Ubuntu promise

* Ubuntu will always be free of charge, including enterprise releases and security updates.
* Ubuntu comes with full commercial support from Canonical and hundreds of companies around the world.
* Ubuntu includes the very best translations and accessibility infrastructure that the free software community has to offer.
* Ubuntu CDs contain only free software applications; we encourage you to use free and open source software, improve it and pass it on.

What is Ubuntu?

Ubuntu is an African word meaning 'Humanity to others', or 'I am what I am because of who we all are'. The Ubuntu distribution brings the spirit of Ubuntu to the software world.

Ubuntu is a community developed operating system that is perfect for laptops, desktops and servers. Whether you use it at home, at school or at work Ubuntu contains all the applications you'll ever need, from word processing and email applications, to web server software and programming tools.

Ubuntu is and always will be free of charge. You do not pay any licensing fees. You can download, use and share Ubuntu with your friends, family, school or business for absolutely nothing.

We issue a new desktop and server release every six months. That means you'll always have the the latest and greatest applications that the open source world has to offer.

Ubuntu is designed with security in mind. You get free security updates for at least 18 months on the desktop and server. With the Long Term Support (LTS) version you get three years support on the desktop, and five years on the server. There is no extra fee for the LTS version, we make our very best work available to everyone on the same free terms. Upgrades to new versions of Ubuntu are and always will be free of charge.

Everything you need on one CD, which provides a complete working environment. Additional software is available online.

The graphical installer enables you to get up and running quickly and easily. A standard installation should take less than 25 minutes.

Once installed your system is immediately ready-to-use. On the desktop you have a full set of productivity, internet, drawing and graphics applications, and games.

On the server you get just what you need to get up and running and nothing you don't.